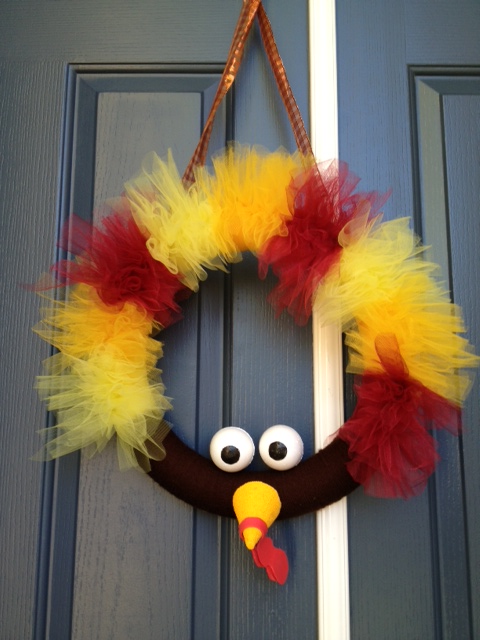
Anyways, while I totally wish I could take the credit for inventing this little guy all on my own, I found the idea on a blog called "Baby Rabies" (kind of like when baby fever is out of control. The author now has two children and I'm not sure she has baby rabies anymore, but the name seems to have stuck.) Jill is the one responsible for these fun tulle creations and she is about 100 million (no hyperbole) times more crafty than I am. She is also better at giving directions, so if you want to make this wreath with some good visuals, click here. If you are okay following my directions sans images, keep reading.
(sorry, I was so absorbed in tying knots on my wreath I forgot to document the experience. Brian and I were also watching "Rambo" on TV, and since it was the first time I'd ever seen it, I was kind of absorbed in the movie.)
You will need:
1 12-inch or 14-inch foam wreath
a ball of brown yarn
red, yellow, and orange tulle (about 2.5 yards each)
a foam triangle-cylinder for the beak (these are right next to the foam
wreaths)
foam balls for the eyes
a sheet of red foamy paper (the squishy kind. Extra points if one side is
sticky)
Your trusty glue gun
floral pins and ribbon (if you are hanging it on a wreath hook like I did)
black and yellow acrylic paint
Okay, after you've put the children to bed and have poured yourself a healthy glass of vino, start the following:
Paint eyes on your foam balls. Set aside to dry.
Paint the foam triangular thing with yellow paint. Also set aside to dry.
Remove the plastic from the wreath, and start wrapping 1/3 of the wreath in brown yarn. This part is really boring, so I suggest watching a cheesy movie from the 80s to keep yourself from falling asleep. Wrap the yarn tightly so there is no white of the wreath showing through. You can hot glue the ends, or just wrap them with extra yarn.
Once the body of the turkey is done, begin with the tulle. You'll need about 12 inches of tulle per knot, and I alternated between 12 reds, 12 oranges, and 12 yellows. Just like with the monster wreath, simply tie each 12" piece of tulle around the wreath in a double knot. If the ends are not all even, don't fret; you can give the little guy a hair cut when you are all done. Just make sure all of the knots are even with each other and line up well.
Once the entire body of the turkey is covered in either yarn or tulle, attach the eyes. I'm no good with tooth picks, so I went to the good stuff: floral pins. Using wire cutters, I cut each pin so it was just one straight piece, and then poked it through the eye. I then jabbed it into the wreath. My eyes were a little googley (it was quite unsettling, really - the eyes seemed to follow me as I moved through the room) so I adhered them with a drop of hot glue on the back side. I lost several finger prints (again) in the process, but I'll be damned if those eyes are going to move on me.
Cut a long cord of red foam and drape it over the beak. If it's already sticky on one side, you won't need to use glue to attach it. Then, with another floral wire, poke the beak into the wreath and voila! Mr. Turkey Wreath is just about done.
We have a hook on our door, so I needed to put a ribbon on the back of my wreath in order to hang it. As I learned from the monster wreath on October, hot glue is only minimally helpful. Instead of trying to glue the ribbon on the back, I jammed more floral pins into the ribbon, and then into the back of the wreath, and you know what? That wreath isn't going anywhere. God bless floral pins.
So I hope you enjoy making a turkey wreath this season! Brian has this strange, sentimental affinity for Thanksgiving - he really feels like it gets overlooked between Halloween and Christmas. He seemed pleased that I made something that honors this holiday, which made me feel good. Even Scotty was excited to meet the turkey the next morning. I believe the exact quote was, "Oh Mom. You did some nice work!" And as we all know, pleasing a three-year old is next to impossible, so I'll take what I can get.
Happy crafting!
PS - if you want to follow me on Pinterest, I'm under "Kim Boschee." Follow me and I'll follow you!


 RSS Feed